
Ever deleted your browsing history in a hurry, only to realize you needed a link you just visited? It’s a common frustration, but it doesn’t have to be the end of the road. Yes, you can see deleted history on Chrome by checking your Google My Activity, restoring backups (Windows/Mac), or using DNS cache. This comprehensive guide will show you how to find what you thought was gone forever.
How to See Deleted Chrome History Through Your Google Account
This is the most straightforward and reliable method for most users. If you were signed into your Google Account while browsing, your history is automatically saved to the cloud, even if you delete it locally from your browser.
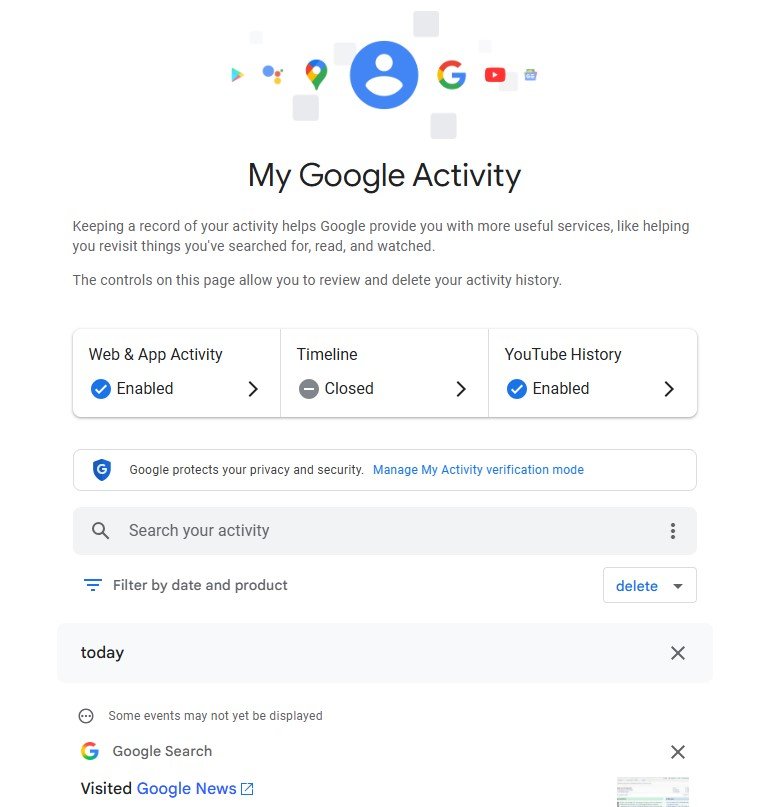
Step 1. Open Google My Activity. In any browser, on any device, navigate to myactivity.google.com.
Step 2. Sign in. Use the same Google Account that was signed into Chrome when you were browsing.
Step 3. Filter your history. The page shows a timeline of all your Google-related activity. You can either scroll to find the content you’re looking for or use the filter options at the top to narrow down the results only to show your Chrome browsing history.
This method is so powerful because it works regardless of the device you are on, offering a single point of recovery for your synced history.
How to Recover Deleted Chrome History on a Windows PC
If your history was deleted locally from a Windows computer, you might still be able to find traces of it in your system files.
1. Restore from a Windows System Backup
Windows has a built-in feature called “System Restore” that creates snapshots of your system files at certain points in time. You can use these restore points to revert your computer’s state and potentially bring back your deleted history files.
Step 1. Open System Restore. Press the Windows key, type “create a restore point,” and hit Enter. This opens the System Properties window.
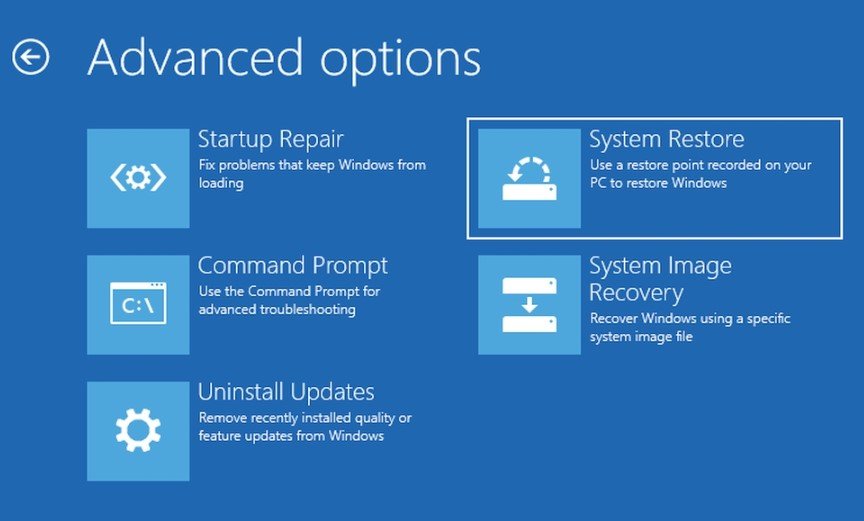
Step 2. Begin the restoration. Click on the “System Restore…” button and follow the prompts.
Step 3. Choose a restore point. Select a restore point from a date before you deleted your Chrome history. Note that this will revert other changes made to your computer since that date, so use this method with caution.
2. Using Command Prompt to View DNS Cache
The Domain Name System (DNS) cache stores temporary records of the websites you’ve visited. While it won’t show the full history, it can reveal the domain names (e.g., google.com) of recently visited sites.
Step 1. Open Command Prompt. Press the Windows key, type “cmd,” and hit Enter.
Step 2. Display the cache. In the command prompt window, type ipconfig /displaydns and press Enter.
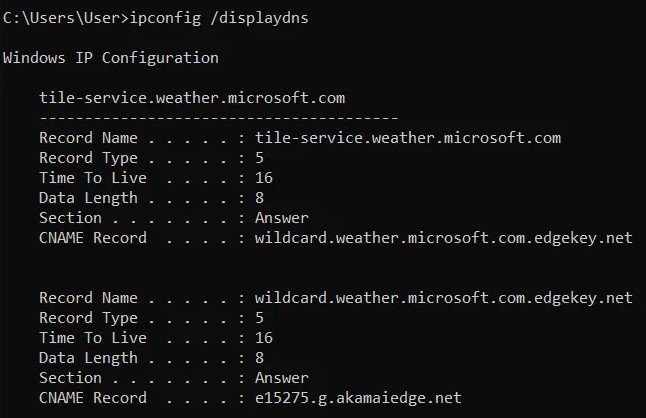
Step 3. Review the list. A list of domains and their IP addresses will appear. You may be able to find the website you are looking for here.
This method only works for recent browsing sessions, as the cache is regularly cleared by the system.
How to Retrieve Deleted Chrome History on a Mac
Mac users can also leverage their computer’s built-in features to find lost browsing history files.
1. Recovering with Time Machine
If you use Time Machine, your Mac automatically creates backups of your files, including your Chrome history.
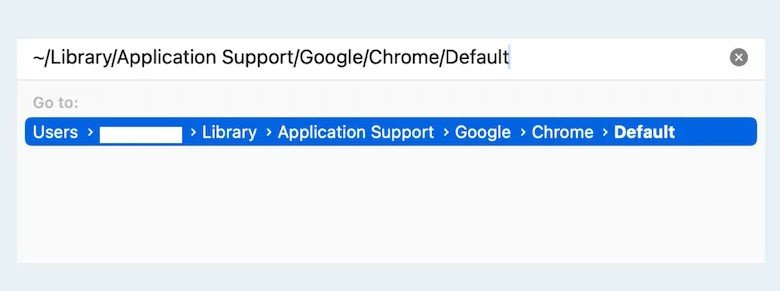
Step 1. Navigate to the Chrome folder. In Finder, select “Go” from the top menu, then “Go to Folder” and paste the following path: ~/Library/Application Support/Google/Chrome/Default.
Step 2. Open Time Machine. Click the Time Machine icon in your menu bar and select “Enter Time Machine.”
Step 3. Go back in time. Navigate to a point in time before your history was deleted. Select the History file and click “Restore.”
2. Recovering with a Third-Party Data Recovery Tool
For a truly deep and reliable recovery, especially if other methods have failed, you may need to use specialized data recovery software. These tools scan your hard drive for remnants of deleted files that haven’t yet been overwritten.

Warning: This method often requires purchasing a paid license, and success is not guaranteed, especially if a significant amount of time has passed since the history was deleted.
Here’s the general process:
Step 1. Choose and Install a Tool. Find a reputable data recovery program for macOS. Common options often offer a free scan to see what files are recoverable before you pay.
Step 2. Scan Your Hard Drive. Run the software and direct it to scan the specific drive or folder where your Chrome data is stored. The file path is ~/Library/Application Support/Google/Chrome/Default.
Step 3. Search for the History File. The software will generate a list of all recoverable files. Look for the file named History. This is the database where Chrome’s browsing history is stored.
Step 4. Restore the File. If the History file is found and the software indicates it’s in a good condition, select it and choose a safe location to restore it to. You can then use a database viewer to access the data.
How to See Deleted Chrome History on a Mobile Device
For smartphones, the options are more limited due to the way mobile operating systems manage data. However, there are still a couple of potential avenues to explore.
1. Checking Synced History via Google My Activity (Android & iPhone)
As mentioned in Method 1, this is the most effective solution for mobile devices. As long as you were logged into your Google account, all your browsing activity should be visible.
Step 1. Open the Google app or Chrome.
Step 2. Visit myactivity.google.com and sign in to your account.
Step 3. View your complete web history. This will show a detailed list of sites you visited, even if you deleted them from the Chrome app.
2. Restoring from an iPhone iCloud Backup
If your browsing data was included in a recent iCloud backup, you may have a chance to recover it. Be aware that this process requires a full data wipe and will revert your phone to the state it was in when the backup was created, so you may lose recent information.
Here’s how you can attempt to restore your history:
Step 1. Begin by navigating to your iPhone’s Settings app.
Step 2. Inside Settings, find and tap on General, then proceed to the Transfer or Reset iPhone option.
Step 3. You will need to choose the Erase All Content and Settings option to start the restore process. Follow the on-screen prompts until you reach the Apps & Data screen.
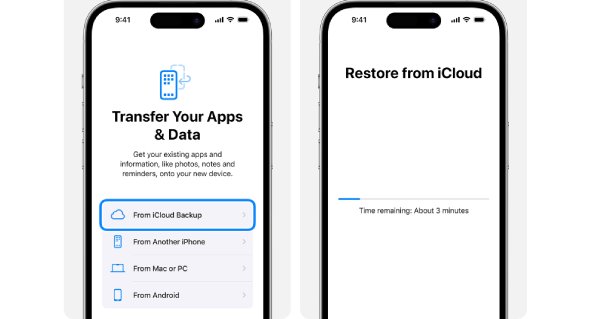
Step 4. From the available choices, select Restore from iCloud Backup.
Step 5. Finally, choose a backup point from a date before you deleted the history you are looking for.
To safeguard against future data loss, it’s a good practice to set up and maintain a regular iCloud backup schedule. You can enable automatic backups to keep your data safe.
Now that we’ve covered different recovery methods across devices, let’s compare them side by side.
| Method | Difficulty | Recovery Rate | Applicable Device(s) | Risks |
|---|---|---|---|---|
| Google My Activity | Easy | High | All (PC, Mac, Mobile) | Only works if history was synced to your Google Account. |
| Windows System Backup | Medium | Medium | Windows PC | Can lose other recent data; requires a previous restore point. |
| Mac Time Machine | Medium | Medium | Mac | Can lose other recent data; requires a previous backup. |
| Windows DNS Cache | Easy | Low | Windows PC | Only shows recent domain names; not full pages. |
| Mobile Backups (iCloud) | Hard | Medium | iPhone | Wipes your phone; only works if a backup was made. |
| Third-Party Recovery Tool | Medium | Medium | Windows, Mac | Often requires a paid license; success is not 100%. |
As you can see, most recovery methods are partial or unreliable. That’s why many parents choose a monitoring solution like FamiSpy for consistent results.
Bonus: A More Reliable Way to Monitor Web Activity
Attempting to recover deleted history can be a time-consuming and often fruitless effort. If you’re a parent looking for a consistent, reliable way to monitor web activity, these reactive methods aren’t practical.
This is where FamiSpy, a dedicated parental control app, provides a proactive solution. Unlike a browser’s history, FamiSpy captures and logs all web activity from your child’s device in real-time. This means that even if they delete their history, use incognito mode, or clear their cache, you’ll still have a complete record.

Key features of FamiSpy include:
- See every website visited, complete with timestamps and durations.
- Track activity that browsers hide.
- More advanced features like message monitoring, location tracking, social media monitoring, view Live Screen, and more.
FamiSpy gives you a clear and consistent view of your child’s digital world, offering peace of mind that a simple history recovery guide can’t.
FAQs
Conclusion
Retrieving deleted browsing history can be a challenge, but you now have a variety of methods to try. From leveraging cloud services like Google My Activity to using dedicated data recovery tools, there are multiple avenues to explore. Remember to act quickly, as some data can be overwritten over time. For ongoing peace of mind, especially for parents, a dedicated monitoring solution such as FamiSpy provides a level of security that even the most advanced reactive recovery tool simply cannot match.
*Don’t Miss: